
Desserts
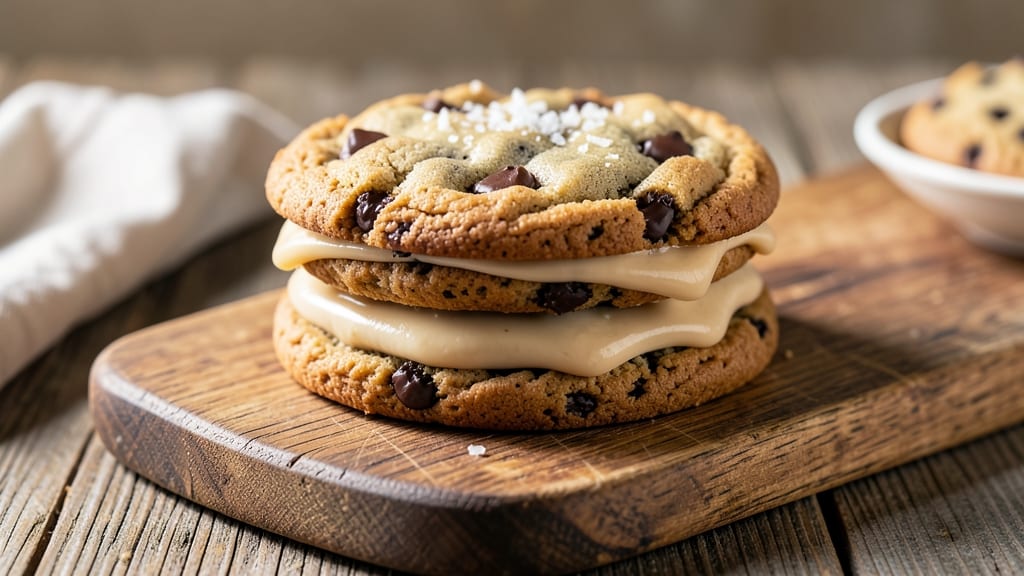
This chocolate chip cookie icing sandwich recipe transforms two pillowy cookies into a creamy masterpiece with just a swipe of vanilla buttercream. 💛 The secret lies in baking cookies with a golden edge and soft center—perfect for holding that luscious icing without crumbling.
I’ve perfected this technique over years of baking, ensuring every bite delivers that ideal balance of crunchy exterior and gooey interior.
The process is simpler than it sounds: bake your cookies until edges are set but centers stay tender, then spread them with smooth buttercream while still warm. This ensures the icing melts slightly into the cookie, creating a sticky, satisfying sandwich that’s impossible to resist.
The key is timing—let the cookies cool just enough to handle, but not so long that they harden.
What you’ll end up with is a dessert that looks as good as it tastes: creamy vanilla frosting peeking between two perfectly baked cookies, ready to be sliced and shared.
The contrast of textures—crispy edges, soft centers, and smooth icing—makes this recipe a crowd-pleaser for any occasion, from holiday gatherings to a simple afternoon treat.
For extra indulgence, try adding a sprinkle of flaky sea salt or a drizzle of melted chocolate between the layers. Store them in an airtight container for up to 3 days, though they rarely last that long. Let’s get baking!
Ingredients for chocolate chip cookie icing sandwich
These premium ingredients create the perfect balance of golden cookies and velvety buttercream.
| Ingredient | Amount | Notes |
|---|---|---|
| All-Purpose Flour 🌾 | 2 ½ cups | Sifted for even texture |
| Unsalted Butter 🧈 | 1 cup | Cold, cubed for baking |
| Granulated Sugar 🍚 | ¾ cup | Superfine preferred |
| Brown Sugar 🍚 | ½ cup | Packed firmly |
| Large Eggs 🥚 | 2 whole | Room temperature |
| Vanilla Extract 🌸 | 2 tsp | Pure, high-quality |
| Semisweet Chocolate Chips 🍫 | 1 ½ cups | High-quality brand |
| Baking Soda 🧪 | 1 tsp | Freshly measured |
| Salt 🧂 | ½ tsp | Fine sea salt |
| Powdered Sugar 🍚 | 3 cups | Sifted for smoothness |
| Unsalted Butter (for icing) 🧈 | ½ cup | Room temperature, softened |
| Heavy Cream 🥛 | ¼ cup | Cold for stability |
| Vanilla Extract (for icing) 🌸 | 1 tsp | Same quality as above |
| Flaky Sea Salt 🧂 | 1 tsp | Optional garnish |
The butter quality is non-negotiable here—Plugrá or Land O’Lakes are my go-tos for consistent performance. For chocolate chips, Ghirardelli or Guittard deliver that melt-in-your-mouth quality. The powdered sugar should be Domon’s if you want that ultra-fine texture, though regular works fine. All ingredients should be room temperature except the butter for baking, which needs to stay cold for those perfect pillowy cookies. Measure your brown sugar firmly packed—don’t scoop or you’ll get inconsistent results.
No vanilla extract? Vanilla bean paste works beautifully—just use half the amount. Substituting butter with vegetable shortening gives a slightly different texture but works in a pinch. For the icing, whipped cream at half the quantity lightens it up if you're watching calories. The sea salt is optional but adds that gourmet touch—Maldon is my favorite, though any flaky variety works. If your chocolate chips are old, toast them briefly in the oven to revive their flavor—3 minutes at 300°F does the trick.
Store the cookies in an airtight container with parchment between layers for up to 5 days. The icing sandwiches keep best at room temperature, though they can be refrigerated for 3 days if you prefer. For extra indulgence, assemble them fresh and serve immediately—the contrast of warm cookies with creamy icing is pure magic. Freeze unassembled cookies for 3 months—just let them thaw completely before adding icing.
Why You'll Love This Recipe
- Here’s what sold me: two cookies pressed together with that creamy, slightly tangy icing—it’s like dessert got a confidence boost. The brown sugar in the dough caramelizes at the edges while staying tender, and the icing? Sweet enough to satisfy a craving but not so heavy it clings to your teeth. (Yes, even on a Tuesday night.)
- No-Fuss Baking: I swear by this recipe because it’s the only cookie dough I can mix while half-watching a show. Just cream butter and sugars, toss in the eggs, fold in the dry stuff—no rolling, no shaping, no waiting for dough to chill. The butter stays soft enough to mix with your fingers, and those chocolate chips? They melt just enough to make every bite feel like a warm hug.
- Double the Magic: Here’s what sold me: two cookies pressed together with that creamy, slightly tangy icing—it’s like dessert got a confidence boost. The brown sugar in the dough caramelizes at the edges while staying tender, and the icing? Sweet enough to satisfy a craving but not so heavy it clings to your teeth. (Yes, even on a Tuesday night.)
- Party in a Box: Between us, this is my go-to for last-minute gatherings. Package them in clear cellophane bags tied with twine, and suddenly you’ve got a gift that looks expensive but costs pennies. Kids adore them, coworkers bring them to meetings, and honestly? They disappear faster than I can say “brown sugar.”
Step-by-step instructions for creating pillowy chocolate chip cookie icing sandwiches
Master the perfect balance of soft, chewy cookies and velvety icing with these precise techniques.
👨🍳 Step 1: Prepare the Cookie Dough Foundation
In a stand mixer fitted with the paddle attachment, combine the 1 cup unsalted butter and both sugars (0.75 cup granulated sugar and 0.5 cup packed brown sugar). Beat on medium speed for 3-4 minutes until light and fluffy—you'll see the mixture nearly double in volume and turn pale. This creaming process is crucial for achieving that signature pillowy texture.
Add the 2 whole eggs, one at a time, mixing just until each is fully incorporated. Scrape down the sides of the bowl as needed. Then add the 2 teaspoons vanilla extract and mix for another 10 seconds. The dough should be smooth but not overly thick—if it looks too stiff, let it sit at room temperature for 5 minutes while you prepare the dry ingredients.
👨🍳 Step 2: Combine Wet and Dry Ingredients
In a separate bowl, whisk together the 2.5 cups all-purpose flour, 1 teaspoon baking soda, and 0.5 teaspoon salt. Sift the mixture directly into the wet ingredients, mixing on low speed for 30-45 seconds until just combined. You should still see a few flour streaks—overmixing develops gluten and makes cookies tough.
Remove the bowl from the mixer and gently fold in the 1.5 cups semisweet chocolate chips using a silicone spatula. The dough will be thick and sticky, but don't worry—this is normal. Divide the dough into 4 equal portions (about 1/4 cup each) and flatten each into a 1-inch thick disk. Wrap each in plastic wrap and refrigerate for at least 1 hour (or up to 24 hours). Chilling prevents excessive spreading and enhances flavor development.
🔥 Step 3: Bake the Cookies to Perfect Doneness
Preheat your oven to 350°F and line two baking sheets with parchment paper. Place the chilled cookie disks 3 inches apart on the prepared sheets. Bake for 11-13 minutes until the edges are golden brown but the centers still look slightly underdone. The cookies will continue cooking on the hot pan after removal.
Let the cookies cool on the baking sheets for 5 minutes before transferring to a wire rack to cool completely. For ideal sandwiches, you want cookies that are still slightly warm but fully set—this ensures they hold up to the icing without crumbling. If any cookies spread too thin, they'll work better for single-layer enjoyment rather than sandwiches.
🥘 Step 4: Create the Creamy Vanilla Icing
In a medium bowl, beat the 0.5 cup unsalted butter (for icing) until smooth and creamy. Add the 3 cups powdered sugar and mix until fully incorporated. Then add the 0.25 cup cold heavy cream and 1 teaspoon vanilla extract (for icing), mixing until the icing reaches a spreadable consistency. If it's too thick, add 1-2 teaspoons milk (not in the ingredient list but commonly used) to achieve the perfect piping texture.
The icing should be thick enough to hold its shape when piped but still smooth enough to spread evenly. For best results, use a piping bag fitted with a small round tip or a spoon to spread directly between cookies. This ensures clean application without excess drips that would make the sandwiches messy.
🍽️ Step 5: Assemble and Garnish the Icing Sandwiches
Once the cookies are completely cool, place 1 teaspoon of icing in the center of each cookie's flat side. Press a second cookie on top, gently pressing down to create a clean sandwich shape. The icing should spread slightly at the edges but not ooze out—this is why we wait for cookies to cool completely before assembling.
Sprinkle the tops with 1 teaspoon flaky sea salt for a sophisticated finish. Let the sandwiches sit at room temperature for 10 minutes before serving to allow the icing to set slightly. This resting period ensures the cookies hold their shape and the icing maintains its creamy texture without melting. Serve immediately for the perfect balance of warm cookie and cool, creamy icing.
Pro Tips For Making Chocolate Chip Cookie Icing Sandwich
- CHILL THE DOUGH: I learned this the hard way—rolling warm cookie dough between two sheets of parchment before baking prevents cracking and gives you those perfect, thick sandwich cookies. Even if you’re impatient (like me), give it 30 minutes in the fridge—it’s worth it for clean edges.
- USE COLD BUTTER: Skip the soft butter shortcut. Cream cold, cubed butter with your sugars until it’s just starting to break down—about 2 minutes in the mixer. This traps air for a lighter texture and keeps the cookies from spreading too much. (Yes, even if your recipe says "softened.")
- WEIGH YOUR FLOUR: Scooping flour from the bag packs in too much air, and your cookies turn out dense. Instead, spoon it into a measuring cup and level it off—this keeps the ratio consistent. I used to skip this, and my cookies always came out heavier than they should’ve.
- ICE THE COOKIES FAST: Let your baked cookies cool on the tray for exactly 5 minutes, then transfer them to a wire rack. While they’re still warm, slap a thin layer of vanilla buttercream between two cookies—this prevents the filling from leaking out later. (Pro move: Use a piping bag for clean, even lines.)
Regional styles of this dish
Classic American Style
In the U.S., these sandwiches are all about bold flavors and generous portions. I recommend using Ghirardelli chocolate chips and adding a pinch of kosher salt directly to the dough for extra depth.
For the icing, I like to pipe it in a swirl pattern between the cookies using a Wilton 1M tip—this creates that iconic "cookie sandwich" look. Serve with a tall glass of cold whole milk for the ultimate nostalgic treat. 🥛
European Elegance
Across Europe, the focus shifts to refined textures and subtle flavors. In France, I’ve seen bakers use dark chocolate chunks instead of chips and a lighter vanilla bean paste in the dough. The icing becomes a delicate Italian meringue buttercream, piped in thin ribbons between the cookies.
A dusting of powdered sugar on top adds a sophisticated finish. Pair with a cup of Earl Grey tea for a truly elegant dessert. ✨
Japanese Twist
In Japan, these sandwiches take on a delicate, almost artistic form. I love their approach of using white chocolate chips alongside semisweet for a subtle contrast. The icing becomes a matcha-infused buttercream, giving the sandwich a vibrant green hue.
For presentation, Japanese bakers often slice the sandwiches diagonally and arrange them on a marble slab with edible gold leaf. Serve with green tea for a harmonious flavor pairing. 🗺️
Mexican-Inspired Spice
For a bold twist, add ½ teaspoon cinnamon and ¼ teaspoon chili powder to the dough, and swap the vanilla icing for a Mexican-style dulce de leche buttercream. Top with crushed pepitas (pumpkin seeds)**> and a sprinkle of tajín for a sweet-spicy kick.
This variation is perfect for brunch or as a dessert after a spicy meal. The contrast of heat and sweetness is truly addictive. 🌶️
Southern Comfort
In the American South, these sandwiches often get a pecan praline twist. Fold chopped pecans into the dough and add a layer of homemade praline buttercream between the cookies. A drizzle of caramel sauce on top ties everything together.
Serve with a glass of sweet tea for the ultimate Southern indulgence. This version is especially popular during holidays and family gatherings. 💛
Nutrition facts
Frequently asked questions
Why do the cookies need to be completely cool before adding icing?
Completely cool cookies prevent the buttercream from melting too quickly and creating a messy sandwich. Warm cookies will soften the icing, causing it to ooze out during assembly. Wait until they're room temperature (about 30-60 minutes) for clean, professional-looking results.
Can I make these sandwiches ahead of time?
Yes! Assemble them up to 24 hours ahead and store in an airtight container with parchment between layers. For best texture, bring to room temperature before serving. The icing will soften slightly but maintains its creamy consistency. If refrigerating, let sit at room temperature for 10 minutes before enjoying.
What if my icing is too thick or too thin?
For thick icing, add 1-2 teaspoons milk at a time until spreadable. If too thin, chill for 15 minutes to thicken naturally. The ideal consistency should hold its shape when piped but still spread smoothly between cookies. For piping precision, use a small round tip or offset spatula.
How can I prevent the cookies from spreading too much?
Chill the dough for at least 1 hour before baking to firm it up. Use cold butter (not softened) and place cookies 3 inches apart on the baking sheet. Bake at 350°F for 11-13 minutes—edges should be golden but centers slightly underdone for that perfect texture.
What's the best way to slice these sandwiches?
Use a serrated knife dipped in hot water and wiped dry between cuts for clean slices. Cut diagonally for elegant presentation or straight down for classic sandwich shapes. For extra flair, dust with powdered sugar or drizzle with melted chocolate after slicing.