
Desserts
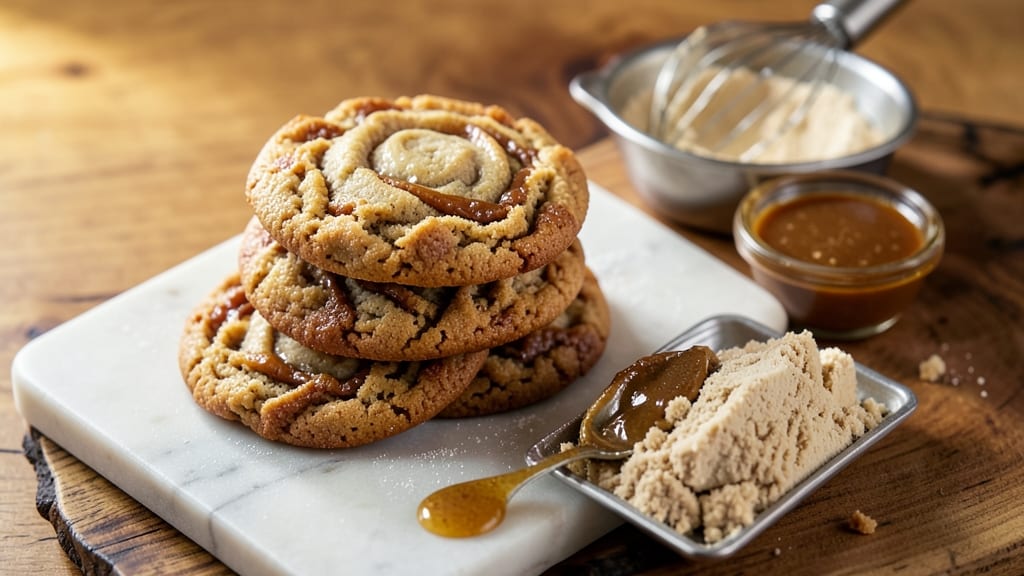
This Cayucos brown butter cookie recipe delivers the perfect balance of nutty richness and caramelized edges that make them irresistible. The star ingredient—brown butter—transforms ordinary cookies into something extraordinary, with its deep, toasty flavor and velvety texture.
I've perfected the technique for achieving those signature swirls and crispy edges every time, ensuring each bite is packed with flavor and character.
The secret lies in properly browning the butter until it reaches that golden, nutty stage—just before it turns completely brown. This process adds a depth of flavor that regular butter simply can't match.
The dough is then chilled to firm up, making it easier to handle and ensuring the cookies maintain their shape while baking. The result? Cookies with a tender, slightly crisp exterior and a soft, buttery center, all wrapped in that unmistakable brown butter aroma.
What sets these cookies apart is the way the brown butter swirls create pockets of extra richness in every bite. The edges develop a beautiful caramelized crust, adding a satisfying crunch that contrasts perfectly with the soft interior.
These cookies are ideal for holiday gatherings, potlucks, or simply treating yourself to something special. They're easy to make but feel like a gourmet dessert, making them a crowd-pleaser every time.
Once you try these, you'll never go back to regular butter cookies. The nutty, caramelized flavor profile is so distinct that it becomes the new standard for your cookie repertoire.
Pair them with a glass of cold milk or a cup of coffee for the ultimate indulgence. Let's get started on creating these delicious treats!
Ingredients for cayucos brown butter cookie
Brown butter swirls and caramelized edges start with these 12 perfect ingredients.
| Ingredient | Amount | Notes |
|---|---|---|
| Unsalted Butter 🧈 | 2 cups | Browned to golden nutty stage |
| Granulated Sugar 🍚 | 1 ½ cups | Superfine preferred for smooth texture |
| Light Brown Sugar 🍚 | ½ cup | Packed firmly for accurate measure |
| Large Eggs 🥚 | 2 whole | Room temperature for even mixing |
| Pure Vanilla Extract 🌿 | 1 tbsp | High-quality for authentic flavor |
| All-Purpose Flour 🌾 | 3 ½ cups | Sifted, spooned and leveled |
| Baking Soda 🧂 | ½ tsp | Ensures proper rise |
| Salt 🧂 | 1 tsp | Kosher or sea salt |
| Vanilla Bean Seeds 🌿 | 1 tsp | Scraped from 1 pod for extra flavor |
| Flaky Sea Salt 🧂 | 2 tbsp | For sprinkling on top |
| Dark Chocolate Chips 🍫 | 1 cup | 70% cocoa for rich flavor |
| Toasted Walnuts 🥜 | 1 cup | Chopped, for texture contrast |
The butter is everything here—Land O'Lakes unsalted or Plugrá if you want to splurge. Browning it to that golden, nutty stage (not burnt!) takes patience, but trust me, it's worth it. I usually brown 1.5 cups at a time in a heavy-bottomed skillet, stirring constantly until it smells like caramel popcorn. Costco sells huge blocks of butter that stay fresh longer, which is perfect for baking batches. If you're nervous about burning it, use a candy thermometer—aim for 350°F (175°C) before it turns fully brown. The vanilla bean seeds add a subtle depth that regular extract can't match, so grab a pod if you're near a specialty store or online retailer.
No vanilla bean? Double the vanilla extract—it won't be identical, but you'll still get that warm vanilla note. Running short on walnuts? Pecans or hazelnuts work just as well, though they toast differently. The chocolate chips can be swapped for chopped chocolate bars (use the same amount), but avoid white chocolate—it won't hold up to the baking. If you're feeling fancy, add 1/4 cup of toasted coconut flakes for a tropical twist. For the sea salt, Maldon flakes are my go-to, but any flaky salt will do. The key is to sprinkle it right after baking while the cookies are still warm so it sticks perfectly.
Brown butter dough keeps best in the fridge for 3 days, wrapped tightly in plastic. For longer storage, freeze the dough balls for up to 3 months—just bake straight from frozen, adding 1-2 extra minutes. Once baked, these cookies stay fresh at room temperature for 5 days if stored in an airtight container. I like to portion the dough into 1.5-inch balls before baking—this ensures consistent size and those perfect caramelized edges. For extra indulgence, store a few cookies in a sealed container with a slice of bread to keep them soft for up to a week.
Why You'll Love This Recipe
- Three-Ingredient Magic: The butter alone does half the work—just brown it until it smells like a bakery window, then mix in sugars and eggs while it’s still warm. No fancy techniques, no waiting for dough to chill. Honestly, I’ve made these with one hand tied behind my back.
- Rich Without Effort: That nutty brown butter? It’s the star, but the combo of granulated and light brown sugar gives it this perfect balance—chewy center, crisp edges, and a vanilla kiss that makes it taste like a hug. (Yes, even on a Tuesday night.)
- Holiday or Snack Attack: These freeze like champs, so I bake a batch in November and pull them out whenever I need a treat—no last-minute stress. They’re also the cookies that impress guests without screaming “I followed a recipe.”
- Budget-Friendly Luxury: You’re basically turning butter into gold. A single stick of high-quality unsalted butter and a splash of vanilla elevate these to “I’d pay double” status, but the cost stays low. My daughter picks out the best pieces, but we never run out.
Step-by-step instructions for Cayucos brown butter cookies
Here's how to create these decadent cookies with rich brown butter flavor and perfect caramelized edges.
Brown the Butter for Maximum Flavor
Start by melting the 2 cups unsalted butter in a heavy saucepan over medium heat. Watch carefully as it begins to foam and bubble—this is when the magic happens. The butter will transform from pale yellow to a rich golden brown with nutty aromas filling your kitchen. This process takes about 5-7 minutes, so don't walk away. You're looking for that distinctive toasty smell and color, not burnt bits.
Once the butter reaches this golden brown stage, immediately pour it into a heatproof bowl and let it cool for 10 minutes. The butter will solidify slightly as it cools, making it easier to work with. This browned butter is the soul of these cookies, giving them that deep, caramelized flavor that sets them apart from regular butter cookies. If you see any foam or browned bits at the bottom, whisk them back into the butter—they're packed with flavor!
Cream the Butter with Sugars
While the butter cools, combine the 1.5 cups granulated sugar and 0.5 cup light brown sugar in the bowl of a stand mixer fitted with the paddle attachment. Once the browned butter has cooled to about 100°F (it should be soft but not melted), add it to the sugar mixture. Mix on medium speed for 3-4 minutes until the mixture becomes light and fluffy, nearly doubling in volume.
This creaming process incorporates air into the dough, which creates those beautiful crackly tops and helps the cookies spread just enough. You'll know it's ready when the mixture is pale and holds peaks when you lift the paddle. If your butter was too warm, the mixture might look more like a paste—just let it cool slightly and continue mixing. The texture should be smooth and creamy, not grainy.
Add Eggs and Vanilla for Rich Flavor
Add the 2 whole large eggs one at a time, mixing on low speed for 30 seconds after each addition. Then add the 1 tablespoon pure vanilla extract and 1 teaspoon vanilla bean seeds, mixing for another 30 seconds until fully combined. The mixture should look smooth and slightly thickened. Here's where it gets fun—the vanilla bean seeds add an extra layer of complexity that takes these cookies from good to extraordinary.
I like to let the mixture sit for 1 minute after adding the vanilla to let the flavors meld slightly. This resting period helps the vanilla fully integrate and prevents overmixing when we add the dry ingredients next. If the mixture looks slightly curdled, don't worry—it will come together beautifully once we incorporate the flour.
Combine Dry Ingredients and Fold in Mix-Ins
In a separate bowl, whisk together the 3.5 cups all-purpose flour, 0.5 teaspoon baking soda, 1 teaspoon salt, and the remaining 1 teaspoon salt (for a total of 2 teaspoons salt). Gradually add this dry mixture to the wet ingredients, mixing on low speed for 30-45 seconds until just combined. You should still see some flour streaks—this prevents tough cookies. Overmixing develops gluten and makes cookies dense instead of tender.
Remove the bowl from the mixer and gently fold in the 1 cup dark chocolate chips and 1 cup toasted walnuts using a silicone spatula. Make sure they're evenly distributed throughout the dough. I like to press the chocolate chips into the dough slightly so they don't all end up in one spot when we scoop. The walnuts add a delightful crunch that contrasts perfectly with the soft, chewy cookie texture.
Chill and Shape for Perfect Cookies
Cover the bowl with plastic wrap and refrigerate for at least 1 hour (I prefer 2 hours or even overnight). Chilling the dough is crucial—it solidifies the butter, which prevents the cookies from spreading too thin in the oven. It also allows the flour to fully hydrate, creating a better texture. The cold dough also means the cookies hold their shape better when they hit the hot oven, resulting in thicker cookies with crispy edges and gooey centers.
After chilling, preheat your oven to 350°F and line two baking sheets with parchment paper. Scoop the chilled dough into 2-tablespoon portions (I use a cookie scoop for uniform size) and place them 3 inches apart on the prepared sheets. Sprinkle each cookie with a pinch of flaky sea salt right before baking—this adds a surprising burst of flavor that balances the sweetness.
Bake to Golden Perfection
Bake the cookies for 11-13 minutes until the edges are golden brown but the centers still look slightly underdone. They'll continue cooking on the hot pan after you remove them from the oven. The cookies should be soft in the middle with crispy, caramelized edges. If you like them more done, bake for an additional 1-2 minutes, but don't overbake—they should pull away from the edges of the parchment paper but still be soft in the center.
Let the cookies cool on the baking sheet for 5 minutes before transferring to a wire rack. Enjoy them warm for the ultimate experience—they'll be soft and gooey inside with crispy, caramelized edges. These cookies are best served fresh from the oven, but they'll keep well in an airtight container at room temperature for up to 5 days. The flavors only deepen as they cool, so they're just as good the next day!
Pro Tips For Making Cayucos Brown Butter Cookie
- Brown the Butter Right: Don’t just melt it—crank the heat to medium-high and swirl the pan until the butter turns deep golden brown with nutty aroma, then immediately cool it 5 minutes before mixing. I used to rush this, and the cookies tasted flat. Patience here makes all the difference.
- Chill the Dough Twice: Rest the dough for 30 minutes after mixing, then shape the cookies and refrigerate another 20 minutes. This prevents spreading and ensures thick, chewy centers. I learned this the hard way when my first batch turned into pancakes.
- Use Room-Temp Eggs: Let eggs sit out for 30 minutes before whipping—they’ll blend smoother and incorporate more air into the batter. Cold eggs make the dough fight you, and that’s a recipe for dense cookies. Trust me, it’s worth the wait.
- Toast the Vanilla: Warm the vanilla extract in a small saucepan over low heat for 2 minutes before adding it to the dough. The alcohol burns off, intensifying the vanilla flavor. Sounds weird, but it works—your cookies will taste richer.
Dietary considerations for this recipe
Gluten-Free Adaptation
To make these cookies gluten-free, replace the 3.5 cups all-purpose flour with a high-quality gluten-free 1:1 baking flour blend like King Arthur Measure for Measure or Bob's Red Mill 1-to-1 Gluten-Free Baking Flour.
Add 1 teaspoon xanthan gum to help bind the dough—this is crucial for maintaining texture. Chill the dough for 2 extra hours since gluten-free flours absorb moisture differently. 🌱
Vegan-Friendly Swap
For a vegan version, use 2 cups vegan butter (like Miyoko's or Earth Balance) and brown it just like regular butter. Replace the eggs with 2 tablespoons ground flaxseed mixed with 6 tablespoons water (let it sit for 5 minutes to gel).
Use 1 teaspoon apple cider vinegar to mimic the acidity of eggs. The texture will be slightly denser but still delicious. 🥜
Nut-Free Option
Skip the walnuts entirely and add 1 cup dried cranberries or white chocolate chips instead for texture. For extra richness, fold in ½ cup toasted coconut flakes or crushed pretzels for a salty-sweet contrast. The dough remains the same—just omit the nuts and add your preferred mix-in. 🍫
Lower Sugar Version
Reduce the granulated sugar to 1 cup and the brown sugar to 0.25 cup for a lighter treat. Add 1 tablespoon monk fruit sweetener or 2 tablespoons honey to compensate for flavor depth.
The cookies will still be rich but with less sweetness. Test with a small batch first—flavor balance is key! 🍯
Lactose-Free Adjustment
Use 2 cups lactose-free butter (like Land O'Lakes Lactose-Free) and brown it as directed. Replace the dark chocolate chips with vegan chocolate chips (like Enjoy Life) to keep the recipe dairy-free. The flavor remains identical, just without lactose. 🧈
Allergen-Free Tips
For egg-free and dairy-free cookies, combine 2 tablespoons ground flaxseed + 6 tbsp water (let sit 5 mins) and use 2 cups vegan butter (like Earth Balance).
Swap vanilla extract for 1 tbsp vanilla bean paste (like Naked Brand) for extra flavor. Always check labels—some gluten-free flours contain traces of dairy. 💡
Nutrition facts
Frequently asked questions
Why does the recipe call for brown butter instead of regular butter?
Brown butter adds a deep, nutty, caramelized flavor that transforms these cookies from ordinary to extraordinary. The browning process creates hundreds of flavor compounds that regular butter simply can't match. This rich, toasty taste is what gives these cookies their signature character and makes them worth the extra step of browning.
How do I know when the butter is properly browned?
Look for a golden brown color with nutty aromas filling your kitchen—not burnt bits! Use a candy thermometer for precision: aim for 350°F (175°C). The butter should smell like caramel popcorn, not acrid smoke. If you see foam or browned bits at the bottom, whisk them back in—they're packed with flavor!
Can I make these cookies without a stand mixer?
Use a hand mixer or even a sturdy wooden spoon. Cream the butter and sugars by hand for 5-7 minutes until light and fluffy. For the eggs and vanilla, mix vigorously for 2 minutes until fully combined. The texture will be slightly less aerated but still delicious.
What's the best way to store leftover cookies?
Keep them fresh in an airtight container at room temperature for 5 days. For longer storage, freeze baked cookies for up to 3 months. Thaw at room temperature—no need to reheat. The flavors actually deepen as they cool, making them perfect for enjoying the next day!
Why do my cookies spread too much or not bake evenly?
This usually happens when the dough isn't chilled long enough. Cold dough prevents excessive spreading. Also ensure your oven is fully preheated and use parchment paper for even baking. For thicker cookies, scoop 2-tablespoon portions and place them 3 inches apart on the baking sheet.