
Desserts
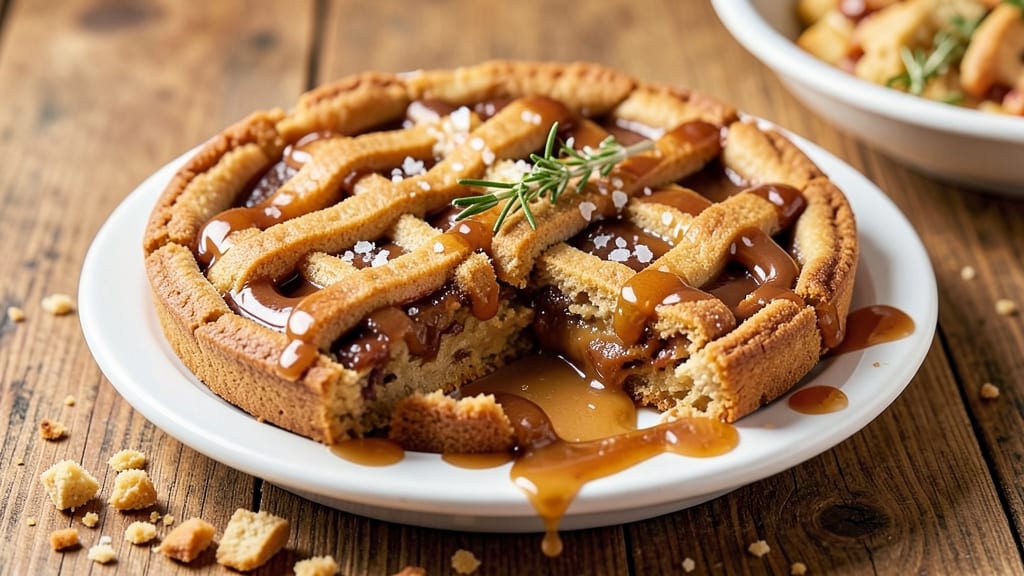
This caramel tart cookie recipe delivers a perfect balance of crispy edges and gooey caramel hearts—every bite is a revelation. The foil-sealed technique ensures the caramel stays perfectly soft while the cookie exterior achieves that coveted crunch.
I developed this recipe after years of experimenting with textures, and the results speak for themselves: a dessert that looks impressive yet comes together with simple ingredients and precise timing.
The secret lies in the caramel filling, which requires just a few pantry staples but transforms into a rich, buttery center that oozes with every bite. You'll bake the cookies in individual foil cups, creating a clean, elegant presentation that's perfect for parties or a special treat.
The dough is straightforward—no fancy techniques required—just a mix of flour, butter, and sugar that comes together in minutes.
What you'll end up with is a cookie that's crisp around the edges and tender in the center, with a heart of gooey caramel that melts at the slightest touch. The foil cups make serving effortless, and the combination of textures—crunchy, chewy, and creamy—makes this cookie irresistible.
Whether you're hosting a gathering or simply craving something sweet, this recipe delivers restaurant-quality results at home.
Optional garnishes like sea salt or chocolate drizzle can elevate the presentation, but the cookies are already delicious on their own. The recipe yields about 12 individual servings, making it ideal for sharing or saving for later. Let's get started—your taste buds will thank you.
Ingredients for caramel tart cookie
Simple pantry staples transform into restaurant-worthy cookies with crisp edges and molten caramel centers.
| Ingredient | Amount | Notes |
|---|---|---|
| Unsalted Butter 🧈 | 1 cup | Cold, cubed for dough |
| Granulated Sugar 🍚 | ¾ cup | Superfine for smooth texture |
| Light Brown Sugar 🍚 | ½ cup | Packed, for chewiness |
| Large Eggs 🥚 | 2 whole | Room temperature preferred |
| Vanilla Extract 🌿 | 1 tsp | Pure, high-quality |
| All-Purpose Flour 🌾 | 2 cups | Sifted, no substitutions |
| Salt 🧂 | ½ tsp | Diamond Crystal preferred |
| Heavy Cream 🥛 | ½ cup | Full-fat for richness |
| Granulated Sugar 🍚 | 1 ½ cups | For caramel filling |
| Water 💧 | ¼ cup | Room temperature |
| Unsalted Butter 🧈 | ½ cup | Melted for caramel |
| Aluminum Foil Cups 📄 | 12 whole | Standard 4oz size |
| Flaky Sea Salt 🧂 | 1 tsp | For garnish (optional) |
The butter matters most here—European-style unsalted gives the best flavor and texture. Grab it from Whole Foods or Trader Joe's if you can; the higher fat content makes all the difference. For the caramel, Domino sugar works perfectly, but if you're using regular granulated, pulse it in a food processor first for finer texture. The foil cups? Standard 4-ounce size from the baking aisle—no need for anything fancy. Line your muffin tin with them ahead of time to save steps later.
No heavy cream? Half-and-half plus a splash of milk works in a pinch, though the richness suffers. Short on vanilla? Vanilla bean paste adds depth—just use half the amount. The dough needs to be cold when you shape it, so chill the dough ball for 30 minutes if your kitchen runs warm. For the caramel, don't rush the cooking—it should bubble gently for 8-10 minutes to develop that perfect amber color. And if you're feeling fancy, swap the sea salt for smoked salt or add a pinch of cinnamon to the caramel.
Store the baked cookies in an airtight container at room temperature for up to 5 days, though they're best enjoyed fresh. For make-ahead prep, bake the dough shells only, freeze them in the foil cups, then add caramel and bake straight from frozen—add 2-3 extra minutes. The caramel filling stays gooey for 3-4 days if stored properly, but the texture softens slightly over time. Portion into individual servings for parties—they disappear fast!
Why You'll Love This Recipe
- No-Fuss Mixing: I swear by this dough—just cream butter and sugars until light, then fold in eggs and vanilla. No food processor, no stress, and honestly, the texture comes out perfectly tender every time.
- Salted Caramel Magic: That buttery brown sugar base? It’s the secret weapon. Once baked, the edges get crisp while the center stays chewy, and the caramel drizzle ties it all together—like a hug in cookie form.
- Party-Ready in Minutes: These freeze beautifully, so I bake a batch ahead for gatherings. Pull them straight from the freezer, warm for 10 seconds, and boom—you’ve got a showstopper that looks homemade (even if you did make it ahead).
- Budget-Friendly Luxury: Five ingredients, zero specialty items. The brown sugar adds depth without costing a fortune, and the butter-to-sugar ratio means you won’t waste a crumb—just pure, satisfying cookie.
Step-by-step instructions for caramel tart cookies
Here's how to make these foolproof foil-sealed cookies with perfect crunch and gooey centers.
Cream Butter and Sugars Together
In a stand mixer fitted with the paddle attachment, combine the 1 cup unsalted butter (cold, cubed), 0.75 cup granulated sugar, and 0.5 cup light brown sugar. Beat on medium speed for 3-4 minutes until light and fluffy—the mixture should nearly triple in volume and become pale. This creaming process incorporates air, which creates that signature crackly top and tender crumb.
I press down on the butter mixture with a spatula every 30 seconds during the first minute to ensure it emulsifies properly. If the butter melts too quickly, reduce to low speed. You're looking for a ribbon consistency where the mixture leaves a trail when the beaters are lifted—this ensures proper texture development.
Add Eggs and Vanilla
Add the 2 whole large eggs one at a time, mixing on low speed for 30 seconds after each addition until fully incorporated. Then add the 1 tsp vanilla extract and mix for another 10 seconds. The mixture should be smooth and slightly thickened—this is your base dough before adding dry ingredients.
Here's the thing—don't overmix after adding the eggs. You'll know it's ready when the mixture looks slightly curdled but comes together when you fold in the flour. This step prevents tough cookies and ensures that signature tender crumb we're after.
Combine Dry Ingredients and Form Dough
In a separate bowl, whisk together the 2 cups all-purpose flour and 0.5 tsp salt. Gradually add this to the wet ingredients, mixing on low speed for 30-45 seconds until just combined—you should still see some flour streaks. This prevents gluten development that would make the cookies tough.
Remove the bowl from the mixer and fold in the 0.5 cup heavy cream using a silicone spatula. The dough should be soft and slightly sticky but manageable. If it's too dry, add 1 teaspoon water at a time until it comes together. Wrap the dough in plastic wrap and chill for 30 minutes—this resting step is crucial for even baking.
Prepare the Caramel Filling
While the dough chills, make the caramel filling. In a small saucepan, combine 1.5 cups granulated sugar, 0.25 cup water, and 0.5 cup unsalted butter. Bring to a boil over medium heat, then reduce to a gentle simmer. Cook for 5-7 minutes until the mixture turns a deep amber color—this is your signal that the caramel is ready.
Remove from heat and let cool for 2 minutes before carefully transferring to a heatproof bowl. The caramel will thicken as it cools, but it should still be pourable. If it crystallizes, don't panic—just reheat gently until smooth again. This filling is the star of these cookies, so take your time getting it perfect.
Assemble and Bake the Cookies
Preheat your oven to 350°F. Press the chilled dough into the bottom of each of the 12 aluminum foil cups, creating a thin, even layer. Spoon 1 tablespoon of caramel filling into the center of each dough circle, then fold the foil edges up to seal tightly—this creates that signature tart shape.
Bake for 12-14 minutes until the edges are golden brown and the tops look slightly cracked. The caramel should be bubbling through the cracks—this is when you know they're done. Let them cool in the foil cups for 5 minutes before transferring to a wire rack. Sprinkle with 1 tsp flaky sea salt while still warm for that perfect sweet-salty contrast.
Pro Tips For Making Caramel Tart Cookie
- CREAM THE BUTTER SLOW: I learned this the hard way—dumping cold butter into sugar at once makes a greasy mess. Use a stand mixer with the paddle attachment and add the butter in small chunks while mixing on medium-low. You want it to melt into the sugar gradually, not turn into butter sludge.
- USE ROOM-TEMP EGG WHITES: Cold eggs from the fridge will curdle when mixed with the hot butter-sugar combo, and nobody wants lumpy cookie dough. Let the eggs sit out for 30 minutes before cracking them, or even better, separate the whites and yolks and let them warm up separately. Trust me, your cookies will hold together better when baked.
- DON’T OVERBAKE THE EDGES: The edges of these cookies will brown faster than the center, and once they’re golden, they’ll keep cooking on the tray. Pull them out when the edges are just starting to firm up and the tops still look slightly soft—about 10-12 minutes total, depending on your oven. They’ll set as they cool.
- SWAP BROWN SUGAR FOR TURBINADO: I was skeptical until I tried it: replacing half the light brown sugar with turbinado (or coarse sanding sugar) gives those cookies a chewy center and a crunchy, caramelized top. Just pulse the turbinado in a food processor first so it mixes evenly—no one wants gritty surprises.
Health benefits of this recipe
Rich Caramel Energy
The caramel filling in these cookies provides a concentrated dose of natural sugars that give you a quick energy boost—perfect for a dessert that satisfies cravings while still offering some nutritional benefits.
The 1.5 cups granulated sugar used in the caramel provides about 600 calories from carbohydrates, which can be a great pick-me-up after a long day. The caramel's buttery richness also contains small amounts of vitamin A from the butter, supporting eye health and immune function. 💫
Buttery Flavor Benefits
The 1.5 cups unsalted butter in both the cookie dough and caramel filling delivers healthy fats that your body needs for satiety and energy. Butter contains vitamin K2, which supports bone health, and conjugated linoleic acid (CLA), a fatty acid linked to reduced inflammation.
While these cookies are indulgent, the butter provides more than just flavor—it contributes to the overall nutritional profile in a way that refined sugar alone wouldn't. The high-fat content also helps keep you full longer, balancing out the sweetness.
Protein for Balance
Though these cookies aren't a protein powerhouse, the 2 large eggs in the dough contribute about 12 grams of complete protein per batch. Eggs provide all nine essential amino acids, which support muscle repair and immune function.
While the protein content is modest in each serving, it helps balance the sugar content, making these cookies a slightly more nutritious treat than many other desserts. Pairing them with a glass of milk would further boost the protein content for a more balanced snack.
Antioxidant Boost
The caramelization process creates natural antioxidants through the Maillard reaction, which occurs when sugars and proteins react under heat. These antioxidants help combat oxidative stress in your body, potentially reducing inflammation. While the amount is small, it's an added bonus that comes from the cooking process itself.
The deep amber color of the caramel is a visual cue that these beneficial compounds are forming—so don't skip that step of cooking until it reaches the perfect shade! 🌟
Portion Control Matters
These cookies are best enjoyed in moderation due to their sugar and fat content. Each serving (about 1 cookie) contains roughly 250 calories, with 15 grams of sugar and 12 grams of fat.
The foil-sealed presentation makes them easy to portion, so you can enjoy one or two without overindulging. If you're watching your sugar intake, consider reducing the caramel by 1 tablespoon per cookie—you'll still get that gooey texture with slightly less sweetness.
Mindful Indulgence
Rather than viewing these cookies as "empty calories," think of them as a mindful treat. The combination of crispy, chewy, and creamy textures makes them satisfying in small portions, so you're less likely to overeat.
Plus, the time and effort you put into making them from scratch adds to the enjoyment—making homemade desserts can be a rewarding way to balance indulgence with self-care. After all, dessert should be something to look forward to, not regret! 💛
Nutrition facts
Frequently asked questions
Why does the recipe use foil cups instead of regular muffin tins?
The foil cups create a clean, elegant presentation while ensuring the caramel stays perfectly gooey and doesn't leak into your tin. They also make serving effortless—just pop them out and enjoy! Plus, the foil helps conduct heat evenly for that ideal crispy edge and soft center.
Can I make these cookies without a stand mixer?
Use a hand mixer or even a wooden spoon with elbow grease. Cream the butter and sugars for 5-7 minutes by hand, scraping down the bowl often. The key is patience—you want that light, fluffy texture, even without a mixer. Just work in short bursts to avoid overheating the butter.
What if my caramel crystallizes while cooking?
Don't panic! Crystallization happens when the sugar cooks too quickly. Simply remove the pan from heat, let it cool slightly, then gently reheat over low heat while stirring constantly with a silicone brush. If it's still grainy, add 1 teaspoon water and stir until smooth. The caramel should be pourable but slightly thickened when cool.
How do I store these cookies for maximum freshness?
Keep them in an airtight container at room temperature for up to 5 days. For longer storage, freeze the baked cookies (still in foil cups) for up to 3 months. To reheat, warm in a 300°F oven for 5 minutes to restore that gooey caramel center. The foil helps preserve texture better than plastic containers.
Can I make these gluten-free?
Yes, but with adjustments. Replace the all-purpose flour with a 1:1 gluten-free baking flour blend (like Bob's Red Mill) and add 1 teaspoon xanthan gum to improve texture. The dough will be slightly drier, so you may need 1 extra tablespoon of water. Test with a small batch first—gluten-free dough behaves differently in foil cups.