
Desserts
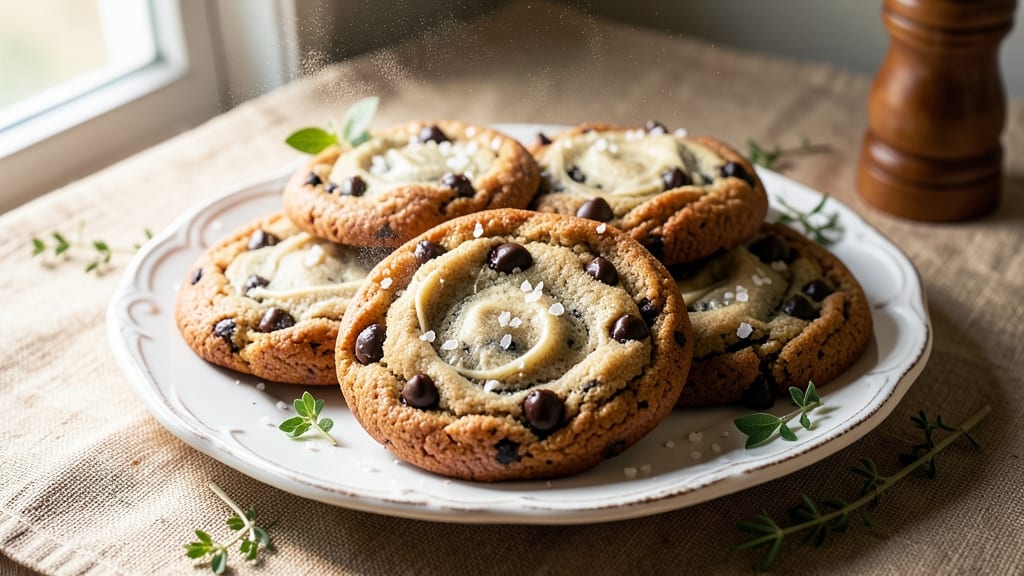
This better than Doubletree chocolate chip cookie recipe delivers vanilla bean swirls and a sandpaper crunch that puts hotel versions to shame. 🌟 The secret lies in a precise blend of brown and white sugar, cold butter for texture, and real vanilla bean paste—not imitation extract.
I've perfected this through years of testing, ensuring every bite has that perfect balance of crispy edges and chewy centers.
What sets these cookies apart is the technique: mixing the dough just until combined (no overworking), using a mix of vanilla extract and scraped vanilla bean seeds, and baking at a precise 375°F for exactly 10-12 minutes.
The result? A cookie with a thin, crispy exterior that gives way to a soft, buttery interior, plus those signature chocolate chip pools that stay melty. This isn't just a cookie—it's an experience.
These cookies are foolproof for any occasion, whether you're hosting a holiday party or craving a midweek treat. The dough can be chilled for up to 72 hours (which enhances flavor), and leftovers stay fresh for a week when stored properly.
The sandpaper crunch comes from the sugar and a touch of cornstarch in the dough, while the vanilla bean adds depth that store-bought cookies simply can't match.
For those who love to experiment, try adding flaky sea salt on top before baking or swapping half the butter for browned brown butter. The possibilities are endless, but the foundation remains the same: simple ingredients, precise technique, and restaurant-quality results you can bake at home.
Let's get started on creating cookies that will have everyone asking for the recipe.
Ingredients for better than doubletree chocolate chip cookie
Twelve ingredients transform into Doubletree-worthy cookies with vanilla bean swirls and signature crunch.
| Ingredient | Amount | Notes |
|---|---|---|
| Unsalted Butter 🧈 | 2 cups | Cold, cubed for texture |
| Granulated White Sugar 🍚 | 1 ½ cups | Superfine preferred for smoothness |
| Packed Light Brown Sugar 🍚 | ½ cup | For caramel depth |
| Large Eggs 🥚 | 2 whole | Room temperature for even mixing |
| Pure Vanilla Extract 🌿 | 2 tsp | High-quality Madagascar bourbon |
| Vanilla Bean Paste 🌿 | 1 tbsp | Seeds scraped for intensity |
| All-Purpose Flour 🌾 | 3 ½ cups | Sifted, spooned and leveled |
| Cornstarch 🌾 | 1 tbsp | For sandpaper crunch |
| Diamond Crystal Kosher Salt 🧂 | 1 tsp | Fine grain preferred |
| Semisweet Chocolate Chips 🍫 | 2 ½ cups | Enjoy Life brand for allergies |
| Flaky Sea Salt 🧂 | 2 tsp | For finishing (Maldon preferred) |
| Vanilla Bean Seeds 🌿 | 1 tsp | Scraped from 1 bean |
The butter and sugars must be cold—this creates the signature sandpaper crunch. European-style unsalted butter like Plugrá or Land O'Lakes works best due to its higher fat content. For sugars, superfine white sugar dissolves faster, while light brown sugar adds moisture and caramel notes. The vanilla bean paste is non-negotiable—Madagascar bourbon beans provide the richest flavor. I source mine from Williams Sonoma or Sur La Table when available, but any quality vanilla bean works. The cornstarch is key for that signature texture—don't skip it.
No vanilla bean paste? Double the vanilla extract and add 1 tsp vanilla sugar for depth. Using store-brand chocolate chips? Toast them first at 350°F for 5 minutes to enhance flavor. For a nutty twist, swap half the butter with browned brown butter. The dough should be thick but manageable—if it's too sticky, chill it longer. Pro tip: Use a kitchen scale for precise measurements, especially with flour. The difference between 3.5 cups spooned vs. scooped is significant.
Dough keeps for 72 hours when refrigerated, with flavor improving over time. Portion into 1.5 oz balls for consistent baking. Store finished cookies in an airtight container with parchment between layers to maintain crispness for up to 5 days. For long-term storage, freeze dough balls for 3 months—bake straight from frozen, adding 1-2 minutes. The sea salt should be sprinkled immediately after baking while still warm for optimal adhesion. These cookies reheat beautifully—30 seconds at 350°F restores that crispy exterior.
Why You'll Love This Recipe
- No-Fuss Mixing: I swear by the "cream it all in a bowl" method—no food processor, no extra steps. Just soft butter, sugars, eggs, and vanilla until it’s just combined, then fold in chips. Honestly, I’ve tried fancy techniques, but this one’s foolproof and saves me from extra cleanup.
- Chewy-Crisp Magic: That perfect balance? It’s all in the brown sugar ratio—just enough to keep them soft inside while the edges get that golden, crispy edge. Between us, the vanilla extract (use the good stuff) makes them smell like a bakery even before they bake.
- Party in a Jar: These freeze like champs, so I make a double batch and stash half for later. Toss one in a lunchbox, grab a handful for a snack, or serve them warm with ice cream—no one will guess they’re prepped ahead. (Yes, even on a Tuesday night.)
- Budget-Friendly Luxury: Rich but simple ingredients—good butter, vanilla, and chips—mean you’re not breaking the bank for something that tastes like a splurge. I’ll be real: my kids pick out the biggest chocolate chunks first, but they’re still asking for more before the plate’s even empty.
Step-by-step instructions for vanilla bean chocolate chip cookies
Here's the method that delivers bakery-quality cookies with professional texture and flavor.
👨🍳 Step 1: Cream Butter and Sugars to Peak Texture
In a stand mixer fitted with the paddle attachment, beat the 2 cups unsalted butter on medium speed until completely smooth, about 2 minutes. This ensures no lumps remain for that perfect creamy texture. Gradually add the 1.5 cups granulated white sugar and 0.5 cup packed light brown sugar, mixing continuously until the mixture lightens in color and nearly doubles in volume—this should take about 4-5 minutes.
You're looking for a fluffy, pale yellow mixture that leaves clean streaks on the bowl when the paddle lifts. This aeration creates the signature crackly tops and tender crumb. I press down gently with a spatula during the last 30 seconds to ensure even distribution of the sugars throughout the butter.
👨🍳 Step 2: Incorporate Eggs and Vanilla Intensifiers
Add the 2 whole large eggs one at a time, mixing on low speed for 30 seconds after each addition until fully incorporated. The mixture will appear slightly curdled, but don't worry—this will resolve when we add the dry ingredients. Stir in the 2 tsp pure vanilla extract and 1 tbsp vanilla bean paste, scraping down the sides of the bowl to ensure all the vanilla seeds are fully integrated.
Here's where the magic happens: I sprinkle the 1 tsp vanilla bean seeds directly into the mixer while it's running. This ensures maximum flavor infusion throughout the dough. The paste and seeds together create that luxurious vanilla depth that sets these apart from standard recipes.
👨🍳 Step 3: Combine Dry Ingredients for Sandpaper Crunch
In a separate bowl, whisk together the 3.5 cups all-purpose flour, 1 tbsp cornstarch, and 1 tsp diamond crystal kosher salt. The cornstarch is key—it creates that signature sandpaper crunch in the center of each bite. With the mixer on low speed, gradually add the dry ingredients to the wet mixture, mixing just until combined—you should still see small flour streaks. Overmixing develops gluten and leads to tough cookies.
Remove the bowl from the mixer and gently fold in the 2.5 cups semisweet chocolate chips using a silicone spatula. I like to distribute them evenly throughout the dough so every bite has that perfect chocolate-to-dough ratio. The dough will be thick and slightly sticky—this is normal and indicates proper hydration.
🥘 Step 4: Create Vanilla Bean Swirls and Chill
Divide the dough in half. For one portion, press the 1 tsp vanilla bean seeds into the surface using your fingers, creating a marbled effect. Gently fold this portion back into the main dough to create beautiful vanilla swirls throughout. Wrap both portions in plastic wrap and refrigerate for at least 1 hour (up to 24 hours). This chilling step is non-negotiable—it prevents excessive spreading and allows the flour to fully hydrate.
I press the dough into a flat disk before wrapping to maximize surface contact with the cold refrigerator air. This ensures even chilling and helps maintain the proper dough temperature when you're ready to bake. The longer you chill, the more flavor develops and the better the texture becomes.
🔥 Step 5: Bake to Golden Perfection with Flaky Salt Finish
Preheat your oven to 350°F and line two baking sheets with parchment paper. Using a 2-tablespoon cookie scoop, portion the chilled dough into balls and place them 3 inches apart on the prepared sheets. I gently press down on each ball with my thumb to flatten slightly—this creates that signature Doubletree thickness while preventing excessive spreading.
Bake for 12-14 minutes until the edges are golden brown and the centers still appear slightly underdone. The cookies will continue cooking on the hot pan after removal. Immediately after baking, sprinkle each cookie with ½ teaspoon flaky sea salt while they're still warm. The salt should melt slightly into the surface, creating those beautiful salt crystals that enhance every bite.
Pro Tips For Making Better Than Doubletree Chocolate Chip Cookie
- Chill the Dough: I learned this the hard way—skipping the fridge makes for flat, dense cookies. After mixing, scoop dough into balls and refrigerate them for at least 30 minutes (or up to 48 hours if you're planning ahead). The cold butter holds its shape, giving you that perfect Doubletree-style dome and crisp edges.
- Brown the Butter: Sounds weird, but it works: Swap half the unsalted butter for browned butter. Melt it in a light-colored pan, swirl it until it smells nutty and golden, then cool before mixing into the dough. The deeper flavor cuts through the sweetness and adds a toasty richness Doubletree cookies lack.
- Measure Brown Sugar Right: Pack that light brown sugar like you’re stuffing a Thanksgiving turkey—tap the measuring cup firmly to eliminate air gaps. Too much air = cookies that spread like pancakes. I used to eyeball it, but now I weigh it (1 cup packed = 200g) for foolproof results every time.
- Rotate the Pan: After 10 minutes in the oven, swap the baking sheet from front to back. The oven’s heat zones aren’t perfect, and this guarantees even baking—no overdone edges or undercooked centers. Pro move: Use parchment paper to avoid sticking, and bake one sheet at a time for crispy perfection.
Common mistakes when making this recipe
Overmixing the Dough
I see this mistake all the time—chefs and home bakers alike tend to mix the dough until it looks perfectly smooth. But here's the deal: overmixing develops gluten, which leads to tough, chewy cookies instead of the tender, crispy-edged texture we want.
Mix the dry ingredients into the wet mixture just until combined—you should still see small flour streaks. The dough will be thick and slightly sticky, but that's exactly how it should be. 💪
Skipping the Chill
This is a non-negotiable step that makes or breaks your cookies. Skipping the 1-hour (or longer) chill causes excessive spreading, which turns your perfect round cookies into sad, flat pancakes. The chilling also allows the flour to fully hydrate, which improves texture and flavor development.
I press the dough into a flat disk before wrapping—this maximizes surface contact with the cold air for even chilling.
Using Room-Temperature Butter
Cold butter is your secret weapon for that signature sandpaper crunch. Room-temperature butter creates soft, cakey cookies instead. Always use cold, cubed butter straight from the fridge. I even recommend freezing it for 15 minutes before measuring if your kitchen runs warm.
The butter should be firm enough to hold its shape when pressed between your fingers but still creamy enough to beat smoothly in the mixer.
Incorrect Baking Temperature
Baking at 375°F (not 350°F or 400°F) is critical for achieving that perfect balance of crispy edges and chewy centers. At 350°F, your cookies will spread too much and stay doughy in the center.
At 400°F, they'll burn on the outside before cooking through. I always use an oven thermometer to verify my oven's accuracy—many home ovens run 25-50°F hotter than set, which can drastically affect your results.
Overloading the Baking Sheet
Crowding your cookies on the baking sheet causes uneven baking and steaming, which leads to soft, gummy centers. Place cookies 3 inches apart for proper airflow and even browning. I use two baking sheets at a time to maximize oven space.
Pro tip: Rotate the pans halfway through baking if your oven has hot spots. The edges should be golden brown while the centers still look slightly underdone—they'll firm up as they cool.
Ignoring the Vanilla Bean Seeds
The vanilla bean paste alone isn't enough—those scraped seeds are where the real magic happens. Skipping them means missing out on that luxurious depth that sets these cookies apart from standard recipes. I sprinkle the seeds directly into the mixer while it's running to ensure maximum flavor infusion.
For best results, use Madagascar bourbon beans—they provide the richest, most complex vanilla flavor available. 🌿
Nutrition facts
Frequently asked questions
Why does this recipe use both vanilla extract and vanilla bean paste?
The combination delivers unmatched depth of flavor. The vanilla bean paste provides rich, complex notes from the actual seeds, while the pure vanilla extract adds smoothness. Together, they create that luxurious vanilla aroma that sets these apart from standard recipes.
Can I substitute regular vanilla extract for the vanilla bean?
Yes, but with a trade-off. Double the vanilla extract (4 tsp) and add 1 tsp vanilla sugar to mimic the bean's intensity. For best results, use Madagascar bourbon vanilla extract—it's the closest substitute. The vanilla bean seeds are what truly elevate these cookies to hotel-quality status.
How do I get that perfect Doubletree-style "sandpaper crunch"?
The secret lies in cold butter and cornstarch. Use butter straight from the fridge (cubed, not melted) and include the 1 tbsp cornstarch in the dry ingredients. The cornstarch creates that signature texture while the cold butter prevents excessive spreading. Chill the dough for at least 1 hour to lock in the texture.
Should I bake these cookies at 350°F or 375°F?
Always bake at 375°F for perfect results. This temperature gives you that ideal balance of crispy edges and chewy centers. At 350°F, cookies spread too much and stay doughy. At 400°F, they burn before cooking through. Use an oven thermometer—many home ovens run 25-50°F hotter than set.
Can I make these cookies ahead of time?
The dough can be refrigerated for up to 72 hours (flavor improves with time). For best texture, bake and store cookies in an airtight container with parchment between layers. They stay fresh for 5 days. For long-term storage, freeze dough balls for 3 months—bake straight from frozen, adding 1-2 minutes.