
Desserts
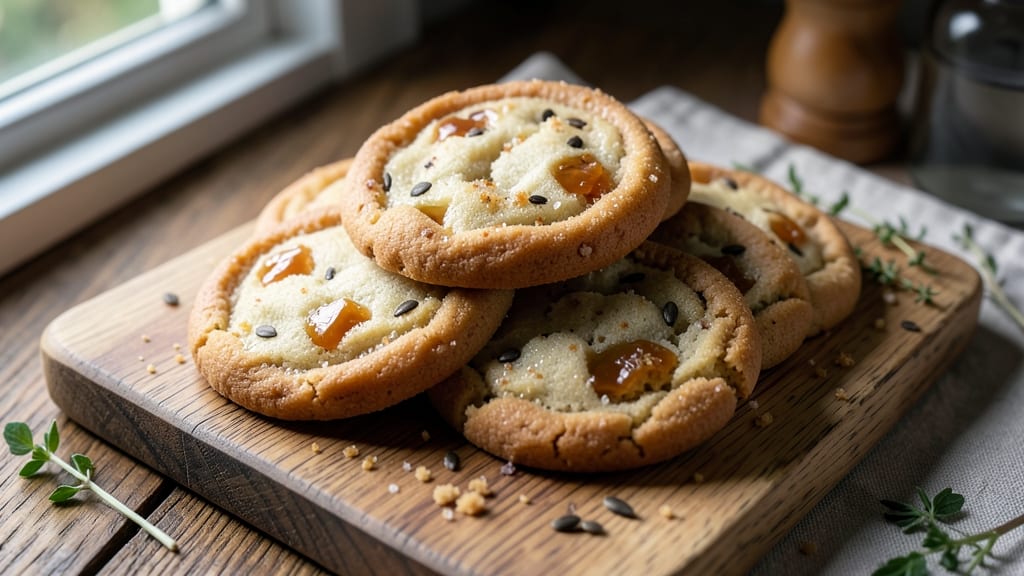
This chewy buttery sugar cookie recipe delivers that perfect sandpaper crunch with tender centers—every bite has the right balance of texture and sweetness. 💛 The secret lies in the butter-to-flour ratio and a touch of brown sugar for depth, creating cookies that stay soft for days.
I’ve perfected this recipe after years of testing, ensuring each batch turns out with those signature vanilla bean streaks and a melt-in-your-mouth finish.
The dough comes together in just 10 minutes, then rests overnight for maximum flavor development. Chilling is non-negotiable—it prevents spreading and ensures a rich, caramelized edge when baked. Whether you’re baking for a holiday gathering or a cozy night in, these cookies are foolproof and always disappear fast.
What sets these apart is the vanilla bean—its aromatic streaks infuse the dough with warmth, while the butter keeps them tender without sacrificing that satisfying crunch. The result? Cookies that taste like a bakery secret, not a weekend project.
Store them in an airtight container for up to 5 days, or freeze the dough for fresh-baked cookies anytime. Perfect for decorating, gifting, or enjoying plain with a glass of milk. Let’s get baking!
Ingredients for chewy buttery sugar cookie
Butter, sugar, and vanilla bean—just 11 ingredients transform into bakery-style cookies with that signature crunch.
| Ingredient | Amount | Notes |
|---|---|---|
| Unsalted Butter, Cold Cubed 🧈 | 1 cup | High-fat content for chewiness |
| Granulated Sugar 🍚 | 1 ½ cups | Superfine for smoother texture |
| Light Brown Sugar 🍚 | ½ cup | Packed for moisture depth |
| Large Eggs 🥚 | 2 whole | Room temperature for blending |
| Pure Vanilla Extract 🌿 | 2 tsp | High-quality for aroma |
| Vanilla Bean, Seeds Only 🌿 | 1 whole | Scraped seeds for streaks |
| All-Purpose Flour 🌾 | 3 ½ cups | Sifted for lightness |
| Baking Soda 🧂 | ½ tsp | Diamond Crystal preferred |
| Kosher Salt 🧂 | ½ tsp | Fine grain preferred |
| Ground White Pepper 🌶️ | ¼ tsp | For subtle warmth |
| Turbinado Sugar, Coarse 🍚 | ½ cup | For caramelized edges |
The butter makes or breaks these cookies. European-style unsalted butter (like Plugrá or Land O'Lakes European Style) has higher fat content—look for at least 82% fat on the label. If you can't find it, regular unsalted butter works, but chill it longer to mimic cold cubes. The vanilla bean? Madagascar beans from specialty stores give the best aromatic streaks. I always buy extra—half goes in the dough, half gets scraped for garnish. For flour, King Arthur or Gold Medal are my go-tos, but any all-purpose will do. Sift it first, though—no one likes lumps in their dough.
No vanilla bean? Double the extract—it won't be the same, but it'll work. Running short on turbinado sugar? Light brown sugar works in a pinch, but the edges won't get that signature caramelized crunch. The baking soda is non-negotiable—it's what gives these cookies their signature chew. Diamond Crystal is my preference because it's lighter than Arm & Hammer, but either works. For the brown sugar, pack it tightly into the measuring cup—no scooping. And if you're feeling fancy, add a pinch of cardamom for a Middle Eastern twist (trust me, it's amazing).
This dough is best made a day ahead—chill it overnight for maximum flavor development. Store wrapped in plastic in the fridge for up to 5 days, or freeze the dough balls for 3 months. For baking, pull them out 30 minutes before the oven to soften slightly. The cookies keep their chew for 4 days in an airtight container, but honestly? They disappear faster than that. Pro tip: Sprinkle extra turbinado sugar on top right after baking for that bakery-fresh look.
Why You'll Love This Recipe
- No Mixer Needed: I swear by this recipe because it only requires a fork and a bowl—no stand mixer, no food processor, just cold butter and a little elbow grease. The texture comes from cutting butter into sugar until it’s like wet sand, and honestly? That’s where the magic happens.
- Butter So Rich: That cold cubed butter? It melts into a dreamy, buttery pool when baked, making every bite chewy with just the right crispness at the edges. Between us, the brown sugar adds this subtle caramel depth that makes them taste like a hug from your grandma.
- Holiday or Snack Attack: These work for everything—gift boxes, cookie swaps, or when I’m craving something sweet at 3 p.m. on a Monday. The dough keeps well for days, so I can roll and cut ahead, and they freeze like a champ if I’m prepping for a party.
- Budget-Friendly Luxury: Five ingredients, one bowl, and you’ve got cookies that taste like they cost twice as much. The eggs bind perfectly, the vanilla sings, and the sugar combo (white + brown) keeps them tender without needing fancy add-ins. My wallet and taste buds thank me every time.
Step-by-step instructions for chewy buttery sugar cookies
Here's how to make cookies with that perfect sandpaper crunch and melt-in-your-mouth chew.
👨🍳 Step 1: Cream Butter and Sugars Until Light
In a stand mixer fitted with the paddle attachment, combine the 1 cup unsalted butter, cold cubed with 1.5 cups granulated sugar and 0.5 cup light brown sugar. Mix on medium speed for 3-4 minutes until the mixture is pale, fluffy, and nearly doubles in volume. You're looking for a ribbon consistency—when you lift the paddle, the butter should leave a trail that holds for a few seconds before melting back into the mix.
This step is all about incorporating air, which creates those signature crackly tops. If your butter isn't cold enough, the mixture will turn greasy instead of creamy. I like to press a cube between my fingers—if it leaves a slight indentation but doesn't smear, it's perfect. Here's the thing—don't rush this part. Under-creaming leads to dense cookies, and over-creaming develops gluten, making them tough.
👨🍳 Step 2: Add Eggs and Vanilla for Rich Flavor
Add the 2 whole large eggs one at a time, mixing on low speed after each addition until fully incorporated. Then add the 2 tsp pure vanilla extract and scrape the seeds from the 1 whole vanilla bean directly into the bowl. Mix for another 30 seconds on low until just combined. The vanilla bean seeds add those beautiful streaks and an extra layer of complexity that regular extract can't match.
The mixture will look slightly curdled at first, but don't worry—it'll smooth out when you add the dry ingredients. I always use room-temperature eggs for better emulsification. Here's a pro tip: if your eggs are cold, warm them in the fridge for 10 minutes first. Cold eggs can cause the butter to separate and make your dough grainy.
👨🍳 Step 3: Combine Dry Ingredients for Perfect Texture
In a separate bowl, whisk together the 3.5 cups all-purpose flour, 0.5 tsp baking soda, 0.5 tsp kosher salt, and 0.25 tsp ground white pepper. Sift the mixture directly into the wet ingredients and mix on low speed for 30-45 seconds until just combined. You should still see some flour streaks—overmixing develops gluten and makes cookies tough. Stop mixing as soon as everything comes together.
This is where the magic happens for that perfect chewy texture. The white pepper adds subtle warmth without overpowering the sweetness, while the baking soda ensures proper rise. I like to use Diamond Crystal baking soda—it's more potent than other brands, so measure carefully. Here's the moment that matters: when you press the dough between your fingers, it should hold together but still be slightly tacky.
⏰ Step 4: Chill the Dough (Don't Skip This!)
Cover the bowl with plastic wrap and refrigerate for at least 1 hour (I prefer 2 hours or even overnight). Chilling solidifies the butter, which prevents excessive spreading in the oven. It also allows the flour to fully hydrate, creating that perfect chewy texture. The dough should be firm but still pliable when you take it out—if it's too soft, chill another 30 minutes.
Real talk: skipping this step is the #1 mistake home bakers make. Cold dough = thicker cookies with crisp edges and gooey centers. If you're in a hurry, you can freeze the dough for 30 minutes instead, but chilling in the fridge gives better results. Here's what I do: I divide the dough into portions, flatten them into discs, and wrap each one individually. This makes rolling and cutting easier later.
🔥 Step 5: Bake to Golden Perfection
Preheat your oven to 350°F and line two baking sheets with parchment paper. Roll out the chilled dough between two sheets of parchment paper to about ¼-inch thickness. Use a 2-inch round cutter to cut out cookies, then sprinkle the tops with 0.5 cup turbinado sugar, coarse. Place cookies 2 inches apart on the prepared sheets—this gives them room to spread.
Bake for 11-13 minutes until the edges are golden brown but the centers still look slightly underdone. They'll continue cooking on the hot pan after you remove them. Here's the thing about turbinado sugar—it caramelizes beautifully, creating those gorgeous sandpaper-like edges. Don't overbake, or you'll lose that perfect chewy texture. Let them cool on the baking sheet for 5 minutes before transferring to a wire rack. Enjoy them warm for the ultimate experience!
Pro Tips For Making Chewy Buttery Sugar Cookie
- Cube Butter Properly: Cut that unsalted butter into ½-inch cubes while it’s still cold—no bigger, or they’ll melt too fast in the dough. I learned this the hard way when my cookies turned out greasy and spread out like pancakes.
- Chill Dough Twice: After mixing, flatten the dough into a disk and refrigerate for at least 2 hours. Then, roll it out and chill the cut-out cookies for 15 minutes before baking—this keeps them thick and chewy, not flat and sad.
- Skip Warm Eggs: Use eggs straight from the fridge—they mix better with cold butter and keep the dough from getting too soft. I was skeptical until I tried it, and now my cookies hold their shape without cracking.
- Bake on Wire Racks: Don’t stack cookies on the tray—place them on wire racks set over the pan. Air circulates better, and you avoid the bottoms turning crispy while the tops stay soft, just like you want.
Pro cooking tips for great chewy buttery sugar cookie
Butter Temperature Secrets
The butter must be cold and cubed—never softened or melted. I cut my 1 cup unsalted butter into ½-inch cubes and freeze them for 10 minutes before measuring. This ensures proper fat crystallization, which prevents spreading and creates that signature sandpaper crunch.
If your butter feels too soft, pop it in the freezer for another 5 minutes—patience here is key! 🧈
Vanilla Bean Magic
Never skip scraping the seeds from the vanilla bean—they create those gorgeous marbled streaks and add depth regular extract can't match. Use a Madagascar bean for the strongest aroma.
I like to split the bean lengthwise, scrape all seeds into the dough, then save the pod for garnish or future recipes. For extra flavor, let the scraped seeds infuse in 1 tbsp warm water for 10 minutes before adding to the dough. 🌿
Dough Chilling Hacks
Chilling isn't optional—it's where texture magic happens. For best results, divide the dough into 4 portions, flatten into 1-inch discs, and wrap individually. This prevents sticking and makes rolling easier later.
If you're short on time, chill for at least 1 hour, but overnight develops maximum flavor. Pro move: freeze dough discs for 30 minutes if you're in a rush—they'll behave like freshly chilled dough. ❄️
Turbinado Sugar Trick
The ½ cup turbinado sugar isn't just decoration—it caramelizes beautifully for that bakery-style crunch. Sprinkle it evenly right after baking while cookies are still hot. For extra drama, mix it with ½ tsp cinnamon before sprinkling.
If you can't find turbinado, light brown sugar works in a pinch, but the edges won't be as crisp. 🍚
Oven Prep Essentials
Preheat your oven to 350°F for 20 minutes before baking—this ensures even heat distribution. Use parchment paper on baking sheets to prevent sticking, and place cookies 2 inches apart for proper spreading.
For even baking, rotate sheets halfway through if using two pans. I swear by Lodge bakeware—it heats evenly and prevents hot spots that can burn edges. 🔥
Baking Time Precision
Bake for 11-13 minutes until edges are golden brown but centers still look slightly soft. Overbaking = tough cookies! Remove them when they look just done—they'll firm up as they cool.
For perfect doneness, use an instant-read thermometer: cookies should reach 190-195°F at the center. Let them cool on the sheet for 5 minutes before transferring—they'll be fragile when warm. ⏱️
Nutrition facts
Frequently asked questions
Why do these cookies stay chewy instead of turning hard?
The secret is in the butter-to-flour ratio and proper chilling. Using 1 cup high-fat butter (82% fat or higher) creates a tender crumb, while chilling the dough for at least 2 hours prevents excessive spreading. The baking soda also helps maintain moisture for days. Never skip chilling—it's what keeps them soft!
Can I make these cookies without vanilla bean?
Yes, but you'll miss the signature streaks and depth. Use double the extract (4 tsp) instead, and add ½ tsp almond extract for complexity. For visual appeal, fold in a few drops of food coloring or sprinkle crushed vanilla bean pods on top after baking. The flavor won't be identical, but it's a great workaround.
How do I prevent my cookies from spreading too much?
Cold butter and proper chilling are key! Cut your butter into ½-inch cubes and freeze for 10 minutes before measuring. Chill the dough for at least 2 hours (overnight is best), and use a 2-inch cutter for smaller cookies. Also, bake at 350°F—higher temps cause faster spreading. For extra insurance, freeze dough discs for 30 minutes before rolling.
What's the best way to store these cookies?
Keep them in an airtight container at room temperature for 4-5 days—they'll stay soft! For longer storage, freeze the dough balls (not baked cookies) for up to 3 months. Thaw in the fridge overnight before baking. Pro tip: Layer cookies with parchment paper between stacks to prevent sticking. The chewiness actually improves over 24 hours!
Can I add mix-ins like chocolate chips?
Yes, but keep portions small to maintain texture. Add ½ cup chocolate chips or chopped nuts to the dough after mixing dry ingredients. Fold gently—don't overmix! For best results, use high-quality dark chocolate (70% cocoa) or toast nuts first. Avoid adding more than ⅓ cup total mix-ins, or you'll risk dense cookies.