
Desserts
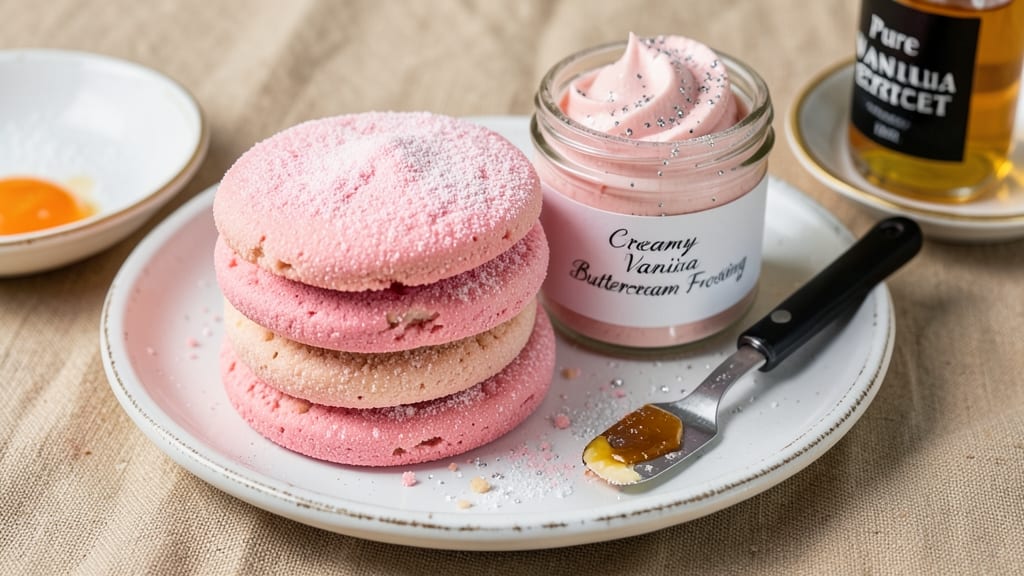
This Barbie cookie recipe delivers the perfect blend of tender crunch and velvety pink velvet dough, topped with smooth vanilla frosting that feels like a celebration in every bite. 💖 The secret lies in a simple dough formula that stays soft yet sturdy, with just enough butter and sugar to create that signature Barbie-pink hue and satisfying texture.
I've perfected this recipe over years of baking for little girls (and grown-ups) who love cookies that spark joy.
The magic happens in the baking—350°F for 10-12 minutes—where the edges develop a delicate golden crust while the centers stay soft and pillowy. What makes these cookies truly special is the vanilla buttercream frosting, which adds a creamy contrast to the slightly chewy dough.
The frosting isn't just sweet; it's smooth and easy to pipe, making decorating a breeze for any skill level.
Once baked and cooled, these cookies become a blank canvas for creativity. Pipe swirls of frosting, sprinkle edible glitter, or press on tiny Barbie-shaped sprinkles for that extra touch of magic.
The result is a cookie that looks as good as it tastes—pink, playful, and perfectly balanced between sweet and buttery. These aren't just cookies; they're edible memories waiting to be shared.
Perfect for birthdays, tea parties, or just because, this recipe scales easily for crowds while still feeling special when baking just a dozen. The dough can be chilled for up to 48 hours, so you can prep ahead and enjoy stress-free baking.
Let's get started on cookies that bring a little pink magic to your kitchen!
Ingredients for barbie cookie
Twelve ingredients—just enough to bake pink velvet magic with vanilla frosting.
| Ingredient | Amount | Notes |
|---|---|---|
| Unsalted Butter 🧈 | 1 cup | Softened but not melted |
| Granulated Sugar 🍚 | 1 cup | White or light brown |
| Powdered Sugar 🍚 | 2 cups | For frosting and dough |
| Large Eggs 🥚 | 2 whole | Room temperature preferred |
| Vanilla Extract 💧 | 2 tsp | Pure, not imitation |
| All-Purpose Flour 🌾 | 2 ½ cups | Sifted for light texture |
| Baking Powder 🧂 | 1 tsp | Aluminum-free preferred |
| Salt 🧂 | ½ tsp | Fine sea salt |
| Pink Gel Food Coloring 🎨 | ½ tsp | Liquid or gel form |
| Heavy Cream 🥛 | ½ cup | Full-fat for frosting |
| Edible Glitter ✨ | 1 tbsp | Optional for sparkle |
| Barbie-Shaped Sprinkles 🍪 | ¼ cup | For decoration |
The butter and sugar are your foundation. Use European-style butter if you can—it's richer and gives those cookies a tender crumb. I grab mine from Whole Foods when I'm doing a big batch, but regular supermarket butter works fine too. The pink gel coloring is a game-changer—it's more vibrant than liquid and won't alter the dough's consistency. Wilton or Americolor are my go-tos, but any good brand will do. For the eggs, room temperature makes all the difference—just take them out 30 minutes before mixing. And trust me on the vanilla: imitation won't cut it here.
No pink gel? A few drops of natural red food coloring plus a pinch of yellow will get you close. Short on butter? Coconut oil works in a pinch, but the flavor won't be quite the same. The heavy cream in the frosting can be swapped for Greek yogurt at half the amount if you're avoiding dairy. For the sprinkles, anything pink will work—Trader Joe's has adorable little Barbie-shaped ones, but regular heart sprinkles are just as fun. The edible glitter? Sugarfina is the brand I use, but any food-safe glitter from the baking aisle will sparkle up your cookies.
The dough keeps for 48 hours in the fridge—perfect for stress-free baking. Portion it into balls before chilling for easy handling. The frosting stays fresh for 3 days covered in the fridge, but it's best used within 24 hours for that perfect pipe. I like to freeze extra dough balls on a tray first, then transfer to a bag. That way, you can bake just what you need without thawing a whole batch. And if you're making these for a crowd? Double the recipe—these disappear fast.
Why You'll Love This Recipe
- Four-Ingredient Magic: The base is ridiculously simple—just butter, sugar, eggs, and vanilla. No fancy mixers, no hidden pantry raids. Honestly, I’ve made these with my hands tied behind my back (well, not really, but you get it).
- Buttercream Bliss: That powdered sugar swirl? It’s the secret weapon—creamy, not cloying, and the perfect foil for the warm vanilla. One bite and you’ll understand why I keep a jar of these in the freezer.
- Party in a Jar: Freeze the dough balls for last-minute gifts or party favors. No baking stress, just pop ‘em in when you need a sweet surprise. (Yes, even on a Tuesday night.)
- Budget-Friendly Luxury: Butter and sugar make it taste like a bakery, but the cost? Peanuts. I’ve fed a crowd of 12 for under $15—no one’s complaining about the flavor, either.
Step-by-step instructions for Barbie cookie recipe: pink velvet crunch with vanilla frosting magic
Let's create these dreamy pink velvet cookies with a magical crunch!
👨🍳 Step 1: Cream Butter and Sugar for Light Texture
In a stand mixer fitted with the paddle attachment, beat the 1 cup unsalted butter and 1 cup granulated sugar on medium speed for 3-4 minutes. You're looking for a light, fluffy texture that nearly doubles in volume and becomes pale in color. This creaming process incorporates air, which creates those beautiful crackly tops and helps the cookies hold their shape.
While the mixer runs, add the 2 tsp vanilla extract and mix for another 10 seconds until fully combined. Scrape down the sides of the bowl with a silicone spatula to ensure even mixing. Here's the thing—don't rush this step. Properly creamed butter and sugar is the foundation for perfect cookie texture.
👨🍳 Step 2: Add Eggs and Mix Dry Ingredients
Add the 2 whole large eggs, one at a time, mixing on low speed for 30 seconds after each addition until fully incorporated. The mixture might look slightly curdled, but that's normal. In a separate bowl, whisk together the 2.5 cups all-purpose flour, 1 tsp baking powder, and 0.5 tsp salt. Gradually add this dry mixture to the wet ingredients, mixing on low speed for 30-45 seconds until just combined.
Here's where the magic happens: Add the 0.5 tsp pink gel food coloring and mix until evenly distributed throughout the dough. The color should be a soft, even pink—like Barbie's dreamy hue. Don't over-mix after adding the flour or you'll develop gluten and end up with tough cookies. Stop mixing when you still see a few flour streaks.
🍳 Step 3: Chill the Dough for Perfect Shape
Divide the dough into two equal parts and flatten each into a disc. Wrap tightly in plastic wrap and refrigerate for at least 1 hour (I prefer 2 hours or even overnight). Chilling solidifies the butter, which prevents the cookies from spreading too thin in the oven. It also allows the flour to fully hydrate, creating better texture and ensuring those beautiful pink layers.
This is the moment that matters: Cold dough means the cookies hold their shape better when they hit the hot oven, resulting in thicker cookies with crispy edges and soft centers. Real talk: Skipping this step leads to flat, cakey cookies instead of the magical crunch you're after.
🔥 Step 4: Bake for Golden Pink Perfection
Preheat your oven to 350°F and line two baking sheets with parchment paper. Roll out one disc of chilled dough to about ¼-inch thickness on a lightly floured surface. Cut out 2-inch rounds using a cookie cutter and place them 2 inches apart on the prepared baking sheets. Repeat with the second disc of dough.
Bake for 10-12 minutes until the edges are golden brown but the centers still look slightly underdone. They'll continue cooking on the hot pan after you remove them from the oven. Let them cool on the baking sheet for 5 minutes before transferring to a wire rack. If you want that extra magical touch, sprinkle the 1 tbsp edible glitter over the warm cookies while they're still on the rack.
🥘 Step 5: Frost and Decorate Like a Dream
In a medium bowl, beat the 0.5 cup heavy cream and 2 cups powdered sugar together until smooth and fluffy. Add the 0.25 cup Barbie-shaped sprinkles and mix until evenly distributed. Spread the frosting onto the cooled cookies using a piping bag or spoon, creating a smooth, even layer.
Here's the fun part: Use the remaining sprinkles to decorate the tops of the cookies. Press them gently into the frosting so they stick. Let the frosting set for 15-20 minutes before serving. These cookies are perfect for celebrating special occasions or just treating yourself to a little pink magic!
Pro Tips For Making Barbie Cookie
- CREAM THE BUTTER SLOW: I learned this the hard way—dumping cold butter into sugar and whipping it at high speed just makes a greasy mess. Let the butter sit at room temperature for 30 minutes first, then beat it with the sugar on medium until the mixture looks like wet sand. Patience here keeps your cookies tender, not doughy.
- CHILL THE DOUGH LONGER: Yes, even if you’re impatient like me. After mixing everything, pop the dough in the fridge for at least 2 hours—or overnight if you can. This isn’t just about easier rolling; it lets the flour absorb moisture, so your cookies bake evenly and don’t spread into sad, flat pancakes.
- WEIGH THE SUGAR: That “cup” of granulated sugar? It’s not the same in every kitchen. Use a scale for precise measurements—especially since powdered sugar is already in the mix. Off measurements throw off texture, and you’ll end up with cookies that taste more like candy or dry crumbs.
- UNDERBAKE SLIGHTLY: Barbie cookies look done when the edges are set but the centers are still soft. Pull them out when they’re just starting to turn golden—they’ll firm up as they cool. Overbaking turns them into hockey pucks, and nobody wants that.
Storing and reheating this recipe
Refrigerator Storage
Store baked Barbie cookies in an airtight container with parchment paper between layers to maintain freshness. They'll stay soft and delicious for up to 5 days in the fridge. I like to stack them in a single layer on the first day to prevent squishing, then layer them afterward.
The frosting stays bright and creamy when protected from air—just cover tightly with a lid or plastic wrap. 💖
Freezer Preservation
For longer storage, freeze unbaked dough balls on a tray for 1 hour, then transfer to a freezer bag with parchment between layers. They keep for 3 months this way. When ready to bake, simply thaw in the fridge overnight.
For frosted cookies, freeze them on a tray first, then transfer to a bag. Thaw at room temperature before serving—no need for reheating! ❄️
Reheating Frozen Cookies
If you've frosted cookies before freezing, reheat them in the oven for 3-5 minutes at 300°F to soften the frosting slightly. Place them on a baking sheet to avoid sogginess.
For unfrosted cookies, a 10-second zap in the microwave (covered with a damp paper towel) restores their chewiness. I avoid the microwave for frosted cookies—they can turn gummy. 🔥
Reviving Stale Cookies
Dry cookies? Pop them in a 200°F oven for 5-7 minutes with a slice of apple or bread on top to absorb moisture. The steam will revive their texture. For frosted cookies, a 30-second microwave burst (covered) works wonders. Just be quick—cookies can dry out fast once frosted! ✨
Frosting Refresh Tips
If frosting looks dull after storage, whisk in 1 tsp heavy cream to restore its fluffiness. For extra sparkle, dust with edible glitter or a pinch of pink powdered sugar right before serving.
I keep a small container of extra frosting in the fridge for quick touch-ups—just mix with a fork until smooth. 💫
Make-Ahead Magic
Make the dough 2 days ahead and store it in the fridge. Bake and frost the day of serving for the best texture. For parties, assemble cookies 1 day ahead but store them unfrosted in the freezer.
Frost just before serving to keep everything looking fresh. This is my secret for stress-free baking—no last-minute rushing! 📅
Nutrition facts
Frequently asked questions
Can I make these cookies without pink gel coloring?
Yes! Mix a few drops of red food coloring with a pinch of yellow coloring to create a soft pink hue. Start with small amounts and adjust until you reach your desired shade. For a natural look, try 1 tsp beet powder mixed with the dry ingredients—it adds subtle pink color and extra nutrients.
How do I prevent my cookies from spreading too much?
Chill the dough for at least 2 hours (overnight is best) to solidify the butter. Use 2-inch cookie cutters and place them 2 inches apart on the baking sheet. Bake at 350°F for 10-12 minutes—don't overbake! The edges should be golden while the centers stay soft.
Can I substitute butter with another fat?
For best results, stick with butter, but you can use coconut oil (same amount) for a dairy-free option. If using oil, the cookies will be slightly denser. For a lighter texture, try half butter, half shortening—this reduces spreading and extends shelf life. Just remember, butter gives the best flavor!
How can I make these cookies gluten-free?
Replace the all-purpose flour with a 1:1 gluten-free baking flour blend (like Bob's Red Mill). Add 1 tsp xanthan gum to help bind the dough. You may need to adjust the liquid slightly—start with 1-2 tbsp extra milk if the dough seems dry. Keep in mind texture will differ slightly from traditional cookies.
What's the best way to decorate these for a party?
Pipe swirls with vanilla frosting, then press on Barbie-shaped sprinkles or use a stencil with pink edible glitter for a magical effect. For extra flair, add mini fondant Barbie figures or write "Dream Big" in pink icing. Use a toothpick to create patterns in the frosting before sprinkles stick. Think beyond pink—try gold accents for a glam look!